Thursday, September 20, 2007

Here is my second character where i change the colour tone to red so it has the opposing effect towards the blue marine

I've also added a hawk picture on the shoulders to make look a bit different, I might add a different picture to the blue marine's shoulder pads

This podium and bench would be props for my machinima, they will be added as static mesh to the Unreal Editor

Wednesday, September 12, 2007

Finally textured my blue Marine Character. The 2nd character will be red so all I would have to to do is change the colour filter and the second character will be ready

Friday, August 31, 2007

This is a rendered version of the Marine that has been smoothed and skylight used. This image was one of the required submission for Week 7 3D Class
Here is where I moved the texture around a bit so that most of the empty spaces are used. I moved the shoulder, elbow an d knee pads to the Head Texture and enlarged them, and enlarged some of the parts in the body so that more detail can now be added to each part compare to before

Here are the 2 texture maps that will now be properly textured in Photoshop to give a proper texture to the character. The head has a bigger sized texture in order to fit more graphic and detail into it due to close ups for the Machinima. The Body doesn't need as much detail but there's a lot of wasted space in the head texture that could've been used for some body parts as will. In the Body texture, you may notice there is only 1 arm and 1 leg. Here is when I'm going to clone the arm and leg for each side that will use the same texture


Thursday, August 30, 2007

Character Unwrap

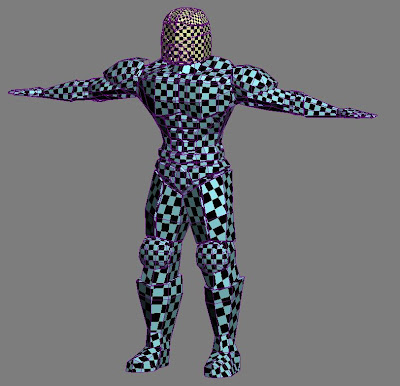
This Marine is made into 1 mesh ready to be unwrap for texturing. In order to unwrap properly, a checker texture is used on the mesh so that it's easier to map the texture so it doesn't obscure the actual texture when it is implemented

This is when a checker texture is put straight onto it, and as you can see it has a lot of UV mapping to do. Like the UT textures, they use a seperate between the Head and the Body, I'm doing the same deal so that the texture map of the head would be much larger for better detail

Here's a finished unwrap of the Head


A finish unwrap of the body, instead of doing more work for the other hand/body, UV unwrap is first used then cloned and attached to the other side

Here's a finish Unwrap so that the Main texture can now be created


Wednesday, August 29, 2007

Machinima Animatic

I have uploaded my Machinima Animatic on to the web, the animatic was based from the storyboards and enchanced by Adobe After Effects that is turned into an animatic video. I recorded my own voice for the dialogue(and some sound effects) for the animatic, but will be using real voice actors and sound effects for the actual machinima. The animatic will give an idea of what the actual machinima will look like and how long it goes for which works out to be approximately 2 minutes and 15 seconds. SOme of the sound effects like the running footsteps wasn't properly implemented as it had to be found fast from the web in order to finish the animatic to meet the deadline


Machinima Animatic